skel is derived from the skeleton because it contains basic structure of home directory
The /etc/skel directory contains files and directories that are automatically copied over to a new user’s when it is created from useradd command.
This will ensure that all the users gets same intial settings and environment.
ls -la /etc/skel/
total 24
drwxr-xr-x. 2 root root 62 Apr 11 2018 .
drwxr-xr-x. 77 root root 2880 Mar 28 03:38 ..
-rw-r--r--. 1 root root 18 May 30 17:07 .bash_logout
-rw-r--r--. 1 root root 193 May 30 17:07 .bash_profile
-rw-r--r--. 1 root root 231 May 30 17:07 .bashrc
The location of /etc/skel can be changed by editing the line that begins with SKEL= in the configuration file /etc/default/useradd. By default this line says SKEL=/etc/skel.
Default Permission of the /etc/skel directory is drwxr-xr-x.
It is not recommended to change the permission of skel directory or its contents. skel directory there are some profiles that needs the permission of read and trying to give it permission of execute will cause some programs/profiles to stop work or not works as expected.
Standard and precise timezone is crucial for the evaluation and execution of many tasks and processes running on a Linux instance. we come across certain circumstances where we need of changing and setting up the different timezone on the Linux system.
Let’s see how can we do it.
Check Current TimeZone :
We can do using date command
date
Thu May 16 10:35:11 IST 2019
or
using timedatectl command
timedatectl
 Local time: Thu 2019–05–16 23:05:55 IST
 Universal time: Thu 2019–05–16 17:35:55 UTC
 RTC time: Thu 2019–05–16 17:35:55
 Time zone: Asia/Kolkata (IST, +0530)
 System clock synchronized: yes
 systemd-timesyncd.service active: yes
 RTC in local TZ: no
How to change:
All the time zones are located under /usr/share/zoneinfo directory
Now create a link the timezone file from the above directory to the /etc/localtime directory
ln -s /usr/share/zoneinfo/US/CET /etc/localtime
In some of the distributions, the timezone is controlled by /etc/timezonefile.
cat /etc/timezone
Asia/Kolkata
To change this to Australia time (Brisbane), modify the /etc/timezone file as shown below.
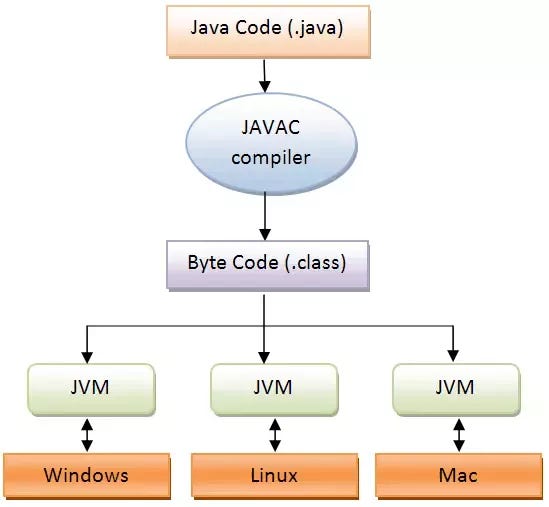
Java compiles the code and converts into byte code(.class)
JVM interprets the byte codes and converts into machine level codes so that it can run on any machine
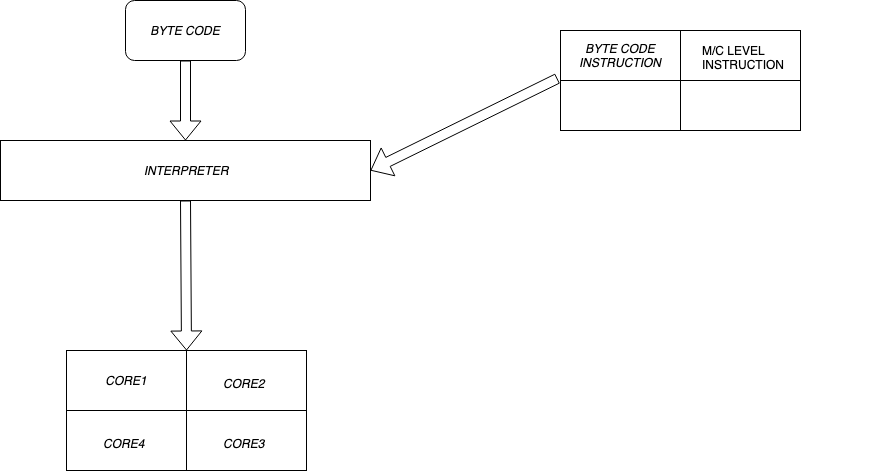
Byte Code To Machine Code:
Byte code is get converted to machine level code using a dictionary of instructions (byte to m/c), because of different types of machines(like Ubuntu, mac, windows, etc) have different types of the instruction set.
The interpreter is very quick to start and load the app.
One problem is interpreter does not perform any optimization, because of that same byte code get converted to machine code.
To solve this problem C1 Compiler used. which uses code cache.
C1 Compiler:
So when interpreter uses counter how many times the same byte code gets converted to machine code which is saved in the code cache.
When the counter reaches the threshold then C1 compiler compiles the codes and save in code cache so that when same byte codes get executed it will get from code cache.
Code cache is a memory area separate from the JVM heap that contains all the JVM bytecode for a method compiled down to native code, each called a nmethod1. This is where the JIT compiled methods are kept
This is also called JIT(just in time) compilation.
Default Code cache size is 240MB in java 8 but we can set a different value, using the flag -XReservedCodeCacheSize.
The default compilation threshold is 1500 for C1 Compiler
C2 Compiler:
After sometime when JVM runs for some time, its start collecting statistics in the background how code is being executed called code profiling. Its creates control flow graphs(code paths). It tries to find out hottest code paths once it has enough statistics then JVM asked for C2 compiler to perform optimizations on the hottest code paths.
It also stores optimized code in Code Cache.
Optimizations Perform by C2:
Dead Code
Escape Analysis
Loops
Methods Inlining
Null check Elimination
etc are used by C2 compiler for to optimize the hottest code
More about C1 and C2:
Two compilers, C1, and C2 run in parallel and keep on optimizing the code
. C1 is preferred for the client application and C2 is preferred for long running server applications.
Tiered compilation combines the best features of both compilers. Client-side compilation yields quick startup time and speedy optimization, while server-side compilation delivers more advanced optimizations later in the execution cycle.
When the Code Cache is constrained (its usage approaches or reaches the ReservedCodeCacheSize), to compile more methods, the JIT must first throw out some already compiled methods. Discarding compiled methods are known as Code Cache flushing.
In JAVA 7 we have the option to select to both the compiler.
In JAVA 8 both are available by default.
Ahead of Time Compilation:
While doing profiling manually or manually check thread or memory dump from JVM we might need to perform compilation ahead of time. this feature is enabled after JAVA9.
After Java9 we have the option to convert some of the classes or libraries to compiled code before the start of the application.
Compile class before:
Before we can use the AOT compiler, we need to compile the class with the Java compiler:
javac <classname>.java
Pass the class to the AOT compiler:
We then pass the resulting <classname>.java to the AOT compiler, which is located in the same directory as the standard Java compiler.
jaotc --output <classname>.so <classname>.class
Running the Program
We can then execute the program while running the program we need to use the flag -XX: AOTLibrary to tell the JVM for AOT compiled class.
java -XX:AOTLibrary=./<classname>.so <classname>
We can also see the library was loaded by adding -XX:+PrintAOT as a JVM argument.
Recently we have done a performance test for WebSocket connections using AWS infrastructure how much concurrent connections can be handled by a single server.
Technology Used:
1 Machine of M3.xlarge. It has 4 CPUs and 15Gb of memory for the server.
10 Machine of c5.large It has 2CPUs and 4Gb of memory for client
Spring Webflux
Netty Server: An Event-driven, Non-blocking Server
Tsung: Performance Testing tool
Server Side:
It just contains simple one controller which handles WebSocket connections
fs.file-max: The maximum file handles that can be allocated.
fs.nr_open: Max amount of file handles that can be opened.
net.ipv4.netfilter.ip_conntrack_max: Specifies how many connections the NAT can keep track of in the tracking table before it starts to drop packets and just break connections.
Tsung is an open-source multi-protocol distributed load testing tool. It’s written in Erlang. Tsung also supports benchmarking WebSocket protocol. Tsung configuration and scenarios are written in xml.