Monday, 27 May 2019

Cross-Origin Resource Sharing (CORS)and Preflight Request

If you are Front Developer or API Developer you came across this term many times so let’s discuss in detail what is this policy is all about. Let’s see first what is CORS.

What is CORS?

CORS that is declared by the w3c on communication between different domains its a mechanism to tell the browser to access resource cross-origin or from a different source, or its a way for the server to check if requests coming in are allowed if they’re coming from a different origin.
  • For Example, The frontend JavaScript code for a web application served from http://abc.com uses XMLHttpRequest to make a request for http://abcd.com/.
  • For security reasons, browsers are restricted cross-origin HTTP requests initiated from within scripts.
  • The CORS mechanism supports secure cross-origin requests and data transfers between browsers and web servers


  • Add HTTP Header(Access-Control-Allow-Origin) in the server side to accept requests by the specified domain or all domains or list of domains.
Access-Control-Allow-Origin: *

CORS Request Types:

As a developer, you need to worry about this when you are constructing requests to be sent to a server but you see in the network log of the browser you will find request and it has performance impact as well. There are two types of request simple and preflight.

Simple Request:

These types of request simple exchange of CORS headers between client and server to check the permissions. To request comes under this category it has to follow the below criteria.

Allowed methods:

GET
HEAD
POST

Allowed Headers:

Accept
Accept-Language
Content-Language
Content-Type (but note the additional requirements below)
Last-Event-ID
DPR
Save-Data
Viewport-Width
Width

Allowed Content-Type

application/x-www-form-urlencoded
multipart/form-data
text/plain
  • No event listeners are registered on any XMLHttpRequestUpload object used in the request; these are accessed using the XMLHttpRequest.uploadproperty.
  • No ReadableStream object is used in the request.

Preflight Request:

If the request does not follow the above criteria then it comes under preflight. The browser automatically sends an HTTP request before the original one by OPTIONSmethod to check whether it is safe to send the original request. If the server specifies that the original request is safe, it will allow the original request. Otherwise, it will block the original request.
  • It is an OPTIONS request, using three HTTP request headers:
Access-Control-Request-Method
Access-Control-Request-Headers
Origin header


Let’s see with the example
Client asking from a server if it would allow a PUT request, before sending a PUT request, by using a preflight request:
OPTIONS /api/ 
Access-Control-Request-Method: PUT 
Access-Control-Request-Headers: origin, x-requested-with
Origin: https://api.com
If the server allows it, then it will respond to the preflight request with an Access-Control-Allow-Methods response header
HTTP/1.1 204 No Content
Connection: keep-alive
Access-Control-Allow-Origin: https://api.com
Access-Control-Allow-Methods: POST, GET, OPTIONS, DELETE
Access-Control-Max-Age: 86400
  • Access-Control-Allow-Origin: The origin that is allowed to make the request, or * if a request can be made from any origin
  • Access-Control-Allow-Methods: A comma-separated list of HTTP methods that are allowed
  • Access-Control-Allow-Headers: A comma-separated list of the custom headers that are allowed to be sent
  • Access-Control-Max-Age: The maximum duration that the response to the preflight request can be cached before another call is made
That’s it
Thanks

Thursday, 16 May 2019

/etc/skel directory in Linux

  • skel is derived from the skeleton because it contains basic structure of home directory
  • The /etc/skel directory contains files and directories that are automatically copied over to a new user’s when it is created from useradd command.
  • This will ensure that all the users gets same intial settings and environment.
ls -la /etc/skel/
total 24
drwxr-xr-x.  2 root root   62 Apr 11  2018 .
drwxr-xr-x. 77 root root 2880 Mar 28 03:38 ..
-rw-r--r--.  1 root root   18 May 30 17:07 .bash_logout
-rw-r--r--.  1 root root  193 May 30 17:07 .bash_profile
-rw-r--r--.  1 root root  231 May 30 17:07 .bashrc
  • The location of /etc/skel can be changed by editing the line that begins with SKEL= in the configuration file /etc/default/useradd. By default this line says SKEL=/etc/skel.
cat /etc/default/useradd
# useradd defaults file
GROUP=100
HOME=/home
INACTIVE=-1
EXPIRE=
SHELL=/bin/bash
SKEL=/etc/skel
CREATE_MAIL_SPOOL=yes
  • Default Permission of the /etc/skel directory is drwxr-xr-x.
  • It is not recommended to change the permission of skel directory or its contents. skel directory there are some profiles that needs the permission of read and trying to give it permission of execute will cause some programs/profiles to stop work or not works as expected.

Change TimeZone in linux

Standard and precise timezone is crucial for the evaluation and execution of many tasks and processes running on a Linux instance. we come across certain circumstances where we need of changing and setting up the different timezone on the Linux system.
Let’s see how can we do it.

Check Current TimeZone :

We can do using date command
date
Thu May 16 10:35:11 IST 2019


or
using timedatectl command
timedatectl 
 Local time: Thu 2019–05–16 23:05:55 IST
 Universal time: Thu 2019–05–16 17:35:55 UTC
 RTC time: Thu 2019–05–16 17:35:55
 Time zone: Asia/Kolkata (IST, +0530)
 System clock synchronized: yes
 systemd-timesyncd.service active: yes
 RTC in local TZ: no


How to change:

  • All the time zones are located under /usr/share/zoneinfo directory


  • Now create a link the timezone file from the above directory to the /etc/localtime directory
ln -s /usr/share/zoneinfo/US/CET /etc/localtime
  • In some of the distributions, the timezone is controlled by /etc/timezonefile.
cat /etc/timezone 
Asia/Kolkata
  • To change this to Australia time (Brisbane), modify the /etc/timezone file as shown below.
# vim /etc/timezone
America/Brisbane
That’s it.
Happy Learning.

Saturday, 11 May 2019

Ahead Of Time VS Just In Time in Java

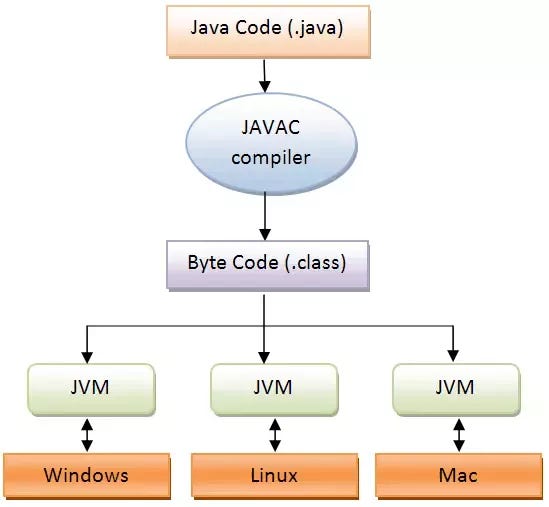
How Java works:

  • Java compiles the code and converts into byte code(.class)
  • JVM interprets the byte codes and converts into machine level codes so that it can run on any machine

Byte Code To Machine Code:

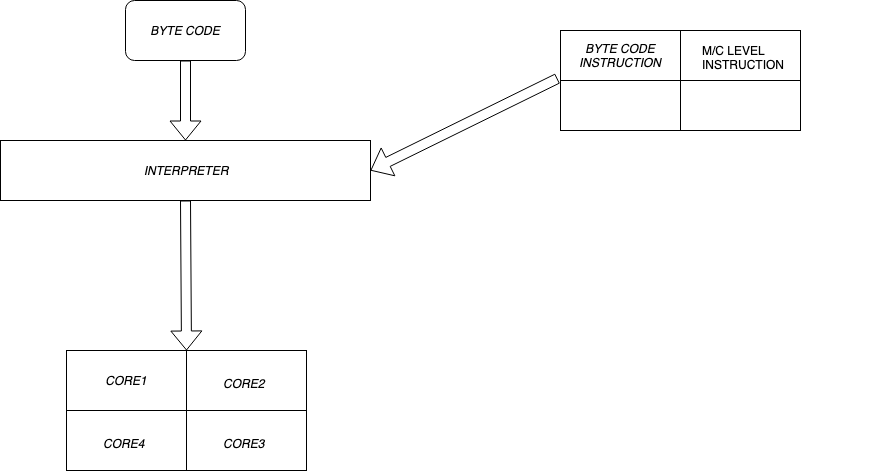
  • Byte code is get converted to machine level code using a dictionary of instructions (byte to m/c), because of different types of machines(like Ubuntu, mac, windows, etc) have different types of the instruction set.
  • The interpreter is very quick to start and load the app.
  • One problem is interpreter does not perform any optimization, because of that same byte code get converted to machine code.
  • To solve this problem C1 Compiler used. which uses code cache.

C1 Compiler:

  • So when interpreter uses counter how many times the same byte code gets converted to machine code which is saved in the code cache.
  • When the counter reaches the threshold then C1 compiler compiles the codes and save in code cache so that when same byte codes get executed it will get from code cache.
  • Code cache is a memory area separate from the JVM heap that contains all the JVM bytecode for a method compiled down to native code, each called a nmethod1. This is where the JIT compiled methods are kept
  • This is also called JIT(just in time) compilation.
  • Default Code cache size is 240MB in java 8 but we can set a different value, using the flag -XReservedCodeCacheSize.
  • The default compilation threshold is 1500 for C1 Compiler

C2 Compiler:

  • After sometime when JVM runs for some time, its start collecting statistics in the background how code is being executed called code profiling. Its creates control flow graphs(code paths). It tries to find out hottest code paths once it has enough statistics then JVM asked for C2 compiler to perform optimizations on the hottest code paths.
  • It also stores optimized code in Code Cache.

Optimizations Perform by C2:

  • Dead Code
  • Escape Analysis
  • Loops
  • Methods Inlining
  • Null check Elimination
etc are used by C2 compiler for to optimize the hottest code

More about C1 and C2:

  • Two compilers, C1, and C2 run in parallel and keep on optimizing the code
  • . C1 is preferred for the client application and C2 is preferred for long running server applications.
  • Tiered compilation combines the best features of both compilers. Client-side compilation yields quick startup time and speedy optimization, while server-side compilation delivers more advanced optimizations later in the execution cycle.
  • When the Code Cache is constrained (its usage approaches or reaches the ReservedCodeCacheSize), to compile more methods, the JIT must first throw out some already compiled methods. Discarding compiled methods are known as Code Cache flushing.
  • In JAVA 7 we have the option to select to both the compiler.
  • In JAVA 8 both are available by default.

Ahead of Time Compilation:

While doing profiling manually or manually check thread or memory dump from JVM we might need to perform compilation ahead of time. this feature is enabled after JAVA9.
After Java9 we have the option to convert some of the classes or libraries to compiled code before the start of the application.

Compile class before:

Before we can use the AOT compiler, we need to compile the class with the Java compiler:
javac <classname>.java

Pass the class to the AOT compiler:

We then pass the resulting <classname>.java to the AOT compiler, which is located in the same directory as the standard Java compiler.
jaotc --output <classname>.so <classname>.class

Running the Program

We can then execute the program while running the program we need to use the flag -XX: AOTLibrary to tell the JVM for AOT compiled class.
java -XX:AOTLibrary=./<classname>.so <classname>
  • We can also see the library was loaded by adding -XX:+PrintAOT as a JVM argument.
That’s it.
Happy Learning.

Thursday, 2 May 2019

Change Default Editor in Ubuntu

In Ubuntu, many of the utilities use the editor to edit the configuration files.
Some of the command like visudo , crontab -e, etc uses the editor to edit there corresponding files. By default, nano is the editor.
In case if you wanted to update or change the default editor you can do it very easily using update-alternatives command.
Lets see how can we do it.
Run Command:
sudo update-alternatives — config editor


Now you can select any editor by entering the sequence number.
For Example, I have selected vim which is option 4
You can validate that editor has changed or not using a command like visudo etc. You should see the editor that you chose, instead of the default.
That’s it.
Happy Learning

Generating Unique Id in Distributed Environment in high Scale:

Recently I was working on a project which requires unique id in a distributed environment which we used as a  primary  key to store in dat...